Showing posts with label gardening. Show all posts

Tuesday, July 8, 2014

How to Get Rid of Cucumber Beetles Naturally


So, I was out in the garden one day weeding. I looked over to my left and saw this little beetle. It was quite flashy. Yellow and black stripes. Being the naive, novice gardener that I am, my reaction was, "Oh! That's a pretty bug! Hi, little bug!." Something in the back of my mind thought that, since I'd never seen this bug in my garden before, maybe it wasn't really supposed to be there. I only saw one of them, though. So, I didn't think too much of it. I made a mental note to look it up.


Two days later, I saw five of them. So now I knew they were invading, and I really needed to research. I thought I might have cucurbit beetles, but wasn't sure.


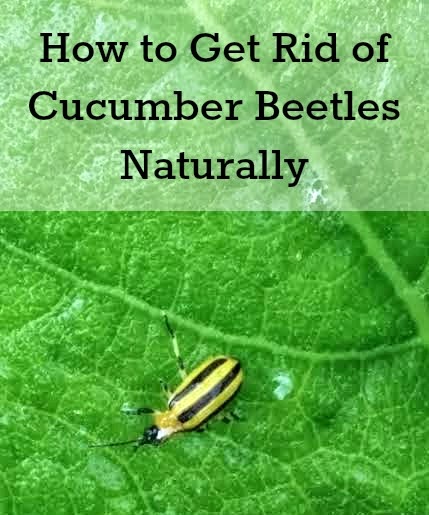
Two more days ... there was no denying it. I have a cucumber (cucurbit) beetle problem. Cucurbit Beetles will attack anything in the cucurbit family (squash, gourds, cucumbers, melons), which includes about 1/3 of my garden. They'll eat the leaves of your plants, but perhaps more menacing, they carry a bacteria in their intestinal tract that can cause bacterial wilt. Bacterial wilt can wipe out an entire crop in a matter of days. Bad news!

You won't find me using invasive pesticides in my garden. So I'm always going to search for a homemade or natural remedy.

First I tried a garlic hot pepper spray. I honestly only tried this for about 6 hours before I decided it wasn't working. The beetles stayed on the leaves, totally unscathed by my spritzing them with garlic and hot pepper. Maybe I wasn't using hot enough peppers (I just used cayenne pepper from my pantry, while some people actually got habaneros from the grocery store and blended those in). This could totally be user error on my part. In fact, it probably is. I'm going to buy some habaneros and try this again as a preventative spray, perhaps? I'll update once I've tried it.

Next I tried food grade diatomaceous earth. I've read time and time again that it doesn't work on cucurbit beetles, but I figured I'd try it since I already had it on hand. Diatomaceous Earth is a totally non-toxic substance that can be used as pest control in your graden (and even on pets for flea control!). It's a powder made from the pulvarized fossils of diatoms (algae) and basically looks like shards of glass under a microscope. It works by being physically abrasive to the insects which come in contact with it. Imagine trying to crawl through shards of glass. Insects won't become immune to physical control the way that they can become resistant to insecticides.


Verdict: Success!! A applied a substantial coating of DE to the leaves, stems, and around the roots off all plants in the curcurbit family (all of my squash and cukes). I wasn't shy with this coating at all. My cuke and squash plants were all white, to give you an idea. I only had 1 open blossom on any of my plants yet, so I wasn't too worried about my bee friends. The next day, there were still a few stubborn guys hanging around, but by day 3, not a single beetle in sight. I'm keeping an eye on the plants and will reapply as necessary. Keep in mind that any rain or even a heavy morning dew will render the DE ineffective. So you'll need to reapply any time it gets wet.


Good Luck! I hope this helps keep your squash and cukes safe this gardening season.


This is a list of some of the awesome sites that I occassionally link my posts at. They're all great blogs about anything from parenting, simple living, cooking, homesteading (backyard and large scale), gardening, Christian life, frugal living, etc. Check them out!
The Chicken Chick, The Prairie Homestead- Homestead Barn Hop, Strangers and Pilgrims on Earth- The Art of Homemaking, Homestead Bloggers Network- Tasty Tuesday, Backyard Farming Connection, Growing Home- Growing Homemakers, Wildcrafting Wednesday, So Much At Home, Hope in Every Season, Green Thumb Thursday, Home Acre Hop, From the Farm Hop, Farmgirl Friday, Front Porch Friday, Simple Meals Friday, Better Hens and Gardens.

Wednesday, July 2, 2014

Simple Tips for Growing Awesome Tomatoes


(Some of my posts may contain referral links. That means that if you clink through one of my links and then purchase something, I get a small commission. Thank you so much!)

"Give a man a fish, he eats for a day. Teach a man to garden, and the whole neighborhood gets tomatoes."


True story.

By now, most of us already have our tomato plants growing in the ground. Up here in the north, I'm starting to see some beautiful little green tomatoes replacing the blossoms. Once a few of them get large enough, I'll harvest some for fried green tomatoes. Mmmmm.

Here are some of my favorite tomato growing tips. I keep it as simple as possible. Like most of you, I don't have the time to research fancy solutions, nor the money to spend on them. So if I can find a solution using what I already have on hand, that's the route I take. If I can't, then it honestly probably won't get done. 

I hope these tips help your maters grow and yield generously. :)


1. Prune the suckers: These are the small shoots that grow in the crotch between a stem and a branch. These growths will never produce fruit, so many gardeners will pinch them off. No sense in letting them use up valuable nutrients! This is especially true for indeterminate varieties of tomatoes.

2. Coffee Grounds and Egg Shells: I keep a bowl on my kitchen counter collect the used coffee grounds and egg shells from the day. At the end of each day, I carry them out to the garden and lay them at the feet of my tomato plants. The coffee grounds work as a great mulch and a fertilizer, as they can contain nitrogen and other nutrients. The crushed tomato shells can be put into a hole before you plant the tomato, or it can be crushed up and laid at the bottom of the plant. This can help add calcium (to prevent blossom end rot), and will also deter slugs from trying to snack on your hard work.

3. Epsom Salts: Dilute 1 Tablespoon of Epsom Salts in 1 Gallon of water, and water your tomato and pepper plants if you suspect a magnesium deficiency. Some researchers are starting to "dispel myths" and claim that there is not, and never has been, sufficient research to claim that this is relevant to home gardeners, but for intensive crop plantings where there's a proven mineral deficiency in the soil. I'm no expert, so I won't form an opinions on this. I think it's worth reading up on what different experts do have to say. However...if my 'maters start showing signs of magnesium deficiency, I'll be all over that epsom salts, myth or not. A gal can get a little desperate when something threatens her babies plants, and she'll try anything that Pinterest says will work.

4. You could also try whispering sweet nothings into their foliage. I won't judge you for serenading your plants in a desperate attempt to convince them to grow. We've all been there. 


When all else fails, powder them in a thick-ish coat of diatomaceous earth and pray. It's working for me (so far).


What are your favorite tips and tricks for growing awesome tomatoes?


Wednesday, June 18, 2014

A June Garden Update

Sometimes as a northern gardener, it can be really frustrating to see blog posts of southern gardeners harvesting zucchini as mine is only just getting its first set of true leaves. Or seeing green tomatoes being harvested, when I'm only just seeing my first tomato blossom! Ah well. Could be worse, right? I watch the show Alaska: The Last Frontier and can only imagine how difficult gardening must be up there ... but they still do it, and they do it well!

So here's a picture update of what's going on in our garden these days. I had some root maggots attack my radishes. I purchased some beneficial nematodes, diatomaceous earth, and some of this stuff and applied all three. Maybe it was overkill, but I kinda panicked. I ended up just pulling up all of the radishes. I have some beets and other veggies planted nearby that root maggots would just love. So I decided to err on the side of caution. So far I haven't seen any evidence of them since pulling up the radishes and applying the nematodes. We'll have to wait and see!

Here we have rhubarb in a pot, peas almost ready for harvest, beets, and one of the 4 types of peppers plants I have growing:

Here we have butternut squash, apples, and a little tomato blossom!
And here some purple cabbage, cauliflower, and zucchini:

This isn't everything. We also have blackberries, strawberries, pumpkins, kale, broccoli, green cabbage, asparagus, cukes, cow peas, blueberries (still too young to produce at 2 years old, but growing well!), a total of 3 varieties of tomatoes (san marzano, black cherry, and brandywine), and 4 varieties of peppers (sweet bell, jalapeno, cayenne, and hungarian hot wax) and I'm sure I'm forgetting something. 

Aside from the root maggots in the radishes, we haven't had any major pest issues (yet). Last year we had a miraculously bountiful harvest and no pests to speak of. I'm a little nervous about what this year will have in store for us ... what are the chances of us having such an uneventful and plentiful garden again this year? 

Next post I plan to chat about some of the things I've learned about growing tomatoes ... every gardener's favorite topic. 

Thursday, February 6, 2014

2014 Garden Plan and Hopes for Spring

Garden PLan Graphic
The best place to find God is in a garden. You can dig for him there.” ~ George Bernard Shaw


Here is a list of what we will be growing in the gardens this year. In addition to this, I also have some blueberry plants and some blackberry brambles. I’d like to find a place for a dwarf peach tree, perhaps. I'll start winter sowing sometime this week. Last year I'd already begun by now, but it's been a crazy few weeks. Another advantage of winter sowing is that you have a little more wiggle room in your planting times.

(P.S. I figured out why I couldn't upload pictures before. Technical issue resolved. Regular stunning sub-par photography will resume moving forward.)

We have had a great deal of snow and freezing temperatures this year. It’s not abnormal for New York, but I think we’ve been colder and snowier than recent years for sure! Thankfully we’ve had bits of sunshine to help keep our moods up. The children and I have enjoyed sitting by a sunny window watching the winter birds out by the feeders. We’re working on learning to identify common birds. We’ll start reading the Burgess Bird Book and following along with the Great Backyard Bird Count in a couple of weeks. Even winter has opportunities for enjoying God’s creation around us!
 
 
Cool Weather Crops:
  • Mesclun
  • Broccoli
  • Cauliflower
  • Kale
  • Radishes
  • Carrots
  • Cabbage 
  • Peas
024
Warm Weather Crops:
  • Butternut Squash
  • Zucchini
  • Cucumbers
  • 3 varieties of tomatoes (a beefsteak, a paste, and a cherry)
  • Peppers (Bell, Hungarian Hot, and Jalepeno)
028
Herbs:
  • Thyme
  • Rosemary
  • Sage
  • Basil
  • Lemonbalm
  • Cilantro
  026
Flowers (these plans are still coming together):
  • Calendula
  • Nasturtiums
  • Sun Flowers
  • I'm thinking I'll order the Cottage Garden flower mix from Botanical Interests
  • Maybe more? I might have my hands full already with the veggie garden. I might keep the flower garden small.
  • I would LOVE to do a Mary garden in the front yard, though. Hmmm…..

I posted here and here about how to create a garden plan.

Christopher Nature Study
The biggest little doing some nature sketches from a sunny window


Wednesday, January 22, 2014

Garden Planning Series, Day 2

***Note: That time you tried to start a blog, and then as you’re getting ready to upload pictures for your 4th blog post, your computer and/or camera goes completely wonky. And your computer says that it can’t recognize what you’ve plugged into the USB port. So then you try slipping that little SD card thingy into the front of the computer, and it does … well, it does absolutely NOTHING.


Yep. That’s me right now. I’m sorry! I will remedy this ASAP. But in the meantime, here’s how I map out my garden:


Last post I discussed the what, when, and how much of garden planning. Now I’m going to introduce you to my super high tech, madly complicated, highly sophisticated method of planning out my garden.


Graph paper. Pencil. I know, I know.


Mind. Blown.


Also, this book is a wannabe homesteader’s BFF. I reference it constantly throughout the year. Everything from how/when to prune your brambles, planting dwarf fruit trees, to brewing your own beer, to gardening (soil prep through harvest!), to small scale livestock. It’s the bee’s knees.


1. Make a list of what you’re going to grow. As you order seed, put a little check mark next to it.

2. Get your graph paper and map out your garden space. This goes for you too, container gardeners. Measure your containers if you have them already and figure out how many square feet of growing space you’re working with. On the graph paper, I use 1 square for each foot of gardening space. So on my main bed, I’m working with about 12’x17’. On the graph paper, that means I’ll draw a 17x12 square. Does that make sense? Hopefully my highly detailed sketches will clarify.


3. Are you doing square foot gardening or traditional rows? I do a hybrid sort of thing. I section off rows or sections of my gardens and then use a square foot garden approach within that space. This chart rocks for figuring out how many plants you can fit into each square foot. Once again, if my babbling is not making sense, I have pictures to help. But if you’re still completely confused, send me a message or leave a comment.  So I have 2’x4’ sectioned off for cauliflower, and according to that handy dandy chart I linked above, I can fit about 6 cauliflower plants in that space. So I draw 6 evenly spaced squiggly circles to remind myself how many cauliflower seeds to plant. I’ll probably sow 10-ish to cover any failures, and then give away or sell whatever plants I don’t have room for.

4. I do mostly winter sowing, so I get to skip over the riveting task of figuring out when to start each seedling. I mean, I know I’m really missing out there. Because what newbie gardener doesn’t like to go back and forth between seed packet to frost date calendars, trying to figure out what date you should start what seeds in order to be on time with starting 4 weeks before first frost date if sowing indoors, but 2 weeks after frost date if starting outdoors? Right? I know. Too lazy, too tired, too busy for that. People, just winter sow. It’s easier. Especially for those of us who are just starting out. Some day when you’re a rock star gardener, totally go ahead and mess with frost dates and grow lamp set ups. Til then, simplify. Ok? Simplify.


That’s really it. Do you have questions about garden planning? Leave them in the comments section and I’ll do my best to help!

Thursday, January 16, 2014

Garden Planning Series, Day 1

There are a few things to consider when planning a garden. (By the way, I've decided to break this garden planning thing up into a few different posts to save you the riveting experience of reading a garden planning novel. I think it’ll be easier to follow this way).

1. Are you going to start from seed, or purchase seedlings? Consider winter sowing as a frugal approach to starting from seed (allowing you to avoid the hefty price tags of grow lights).

2. Are you doing raised beds, container gardens, or a traditional garden in the ground? A combination? Pinterest houses a wealth of ideas on container gardening and raised beds. Go there and browse!

3. How much growing space do you have?

4. What are you going to grow this year?

A lot of garden planning articles will tell you to start small. Learn how to grow a couple of things, then add more next year. That's cool. If you're patient. I'm not. So, I say go big or go home, baby. That may or may not be the advice of a Type-A, overachieving, run-yourself-into-the-ground, kind of person. I like to just go for it. Some of your plants may not thrive. So what? You'll still learn something and gain wisdom to use next year. Failure is okay. It's actually guaranteed in the world of gardening. You just have to learn from it, apply your new knowledge to next year, and carry on. Each pack of seeds costs a couple of bucks. You probably won’t even use an entire packet in one season for most things, so really, you don’t have a whole lot to lose here.

Watchya gonna grow? Grow things that your family enjoys eating. That's a given. 
onions
Another important tip is to use your space efficiently. Last year I allotted a lot of garden space to growing onions and carrots because we eat a lot of them. In hindsight, organic onions and carrots are one of the most affordable organic produce items at my grocery store and at the local farm stands. I'd rather use my limited garden space for things that are extremely expensive to buy, or that I can't find locally. Butternut squash costs $1/lbs around here (and that’s for conventional, GMO squash that is probably not grown anywhere near me). I was able to grow 60-70 lbs of squash, it was heirloom, it was grown organically. All from 2 vines. I spent about $2.50 for that pack of seeds and I have plenty left for this years garden. That’s a solid investment of my time, money, and space.
 
Plus, I kept pulling my carrots too early because I was too impatient. I wanted to see my beautiful multicolored carrots!! My impatience basically meant a waste of seed money and garden space.
Caliope Carrots
Oookay. Welp. That is one cute kid holding some seriously beautiful, albeit tiny, carrots (those are the caliope carrots from Botanical Interests, btw!). Maybe we’ll grow just a few carrots this year. Winking smile 
 
How many of each plant should you grow? I always use this chart as a guideline. It's for a family of 4, so I adjust as necessary. Plus I like to grow extra for freezing and canning.

Once you have a list of what you're going to grow, you can choose varieties from your seed catalogs and place your first order! Read the descriptions and take the length of your growing season into consideration (find your first and last frost dates by zip code HERE . I like to break my seed orders up so that it's not a significant strain on my budget to order all at once. I'll start with ordering the first few crops I plan to plant, which would be things like your brassicas, lettuces, carrots etc. Then with the next paycheck, I'll order a few more seed packets.

Alright, that’s it for now! Adios muchachos.
 
Next up: Mapping it out.


I shared this over at: Frugally Sustainable


Thursday, January 9, 2014

Winter Sowing


I think most people who are interested in gardening realize that starting from seed is generally the most affordable way to go. Even if you go with fancy pants organic heirloom varieties, you’re still going to save a boatload with starting from seed. Sounds simple, right? Get some seeds, plant them in some recycled containers with some soil, and then put them under … whoa. Wait a minute. Put them under what? You can only put so many seedlings on a window sill. So, what do you do? Grow lamps? A green house?

Some may be fortunate enough to live in a warmer climate where they don’t need to extend their growing season in order to get a decent yield. As for the rest of us? Suddenly, starting from seed isn’t so frugal when you’re talking about spending hundreds on grow lamps or a green house. Sure, it pays off in the end. You’ll get years of use out of them. That’s true. It’s a worthy investment. But what if you don’t have the cash now?

Before you know it, you’re buying half-dead hybrid seedlings from a department store, only to have them refuse to grow, never mind produce. All because you just can’t afford the set up required for starting from seed. Not that I know from experience or anything.

My friends, let me welcome you to the world of winter sowing. It’s amazing. It’s freaking amazing. And you can do it on a shoestring budget, even if you live in a cool climate. You can do it for veggies, flowers, and herbs. You need a few things: Plastic containers that are clear. My favorites are milk jugs and clamshell type produce containers. Soil. Water. Mother Nature. That’s it!

I’ll share some links to websites where folks who are way more experienced than I have already explained it in detail. I winter sowed almost everything last year. Anything that needed to be planted before my last frost date got winter sowed with the exception of peppers and tomatoes. I successfully grew onions, kale, mesclun, butter crunch lettuce, cilantro, thyme, marjoram, sage, and broccoli with the winter sowing method. All the rest got direct planted after the last frost date, including squash, zucchini, pumpkins, cukes, beans etc.
11744_10100151532335215_1167683083_n
(Pictured above are some mesclun, kale, and broccoli seedlings. These were winter sown in late January last year. This picture was taken outside in April, 6 weeks before my last frost date! Look at how strong and healthy and adorable they are! )
I was not able to successfully winter sow tomatoes or peppers, and ended up buying heirloom seedlings from a local nursery. I’m going to try again this year with different varieties. I’ll update!
Here are some links that describe winter sowing in detail. I used these as a guideline last year:
http://www.agardenforthehouse.com/2012/11/winter-sowing-101-6/
http://www.agardenforthehouse.com/2012/01/what-to-winter-sow-and-when/
http://www.wintersown.org/
What to Winter Sow and When: http://www.agardenforthehouse.com/2012/01/what-to-winter-sow-and-when/

969738_10100171371297775_1270553980_n
(The same mesclun pictured above, thriving!)
So, basically you create little greenhouses out of your recycled containers. You poke or drill drainage holes on the bottom and vent holes on the top, put in 3-4 inches of soil, plant your seeds, water, and then stick them outside. Yes. Stick your tender little baby seeds out in the snow. As the weather freezes, thaws, freezes, thaws, freezes (… you get the idea), it softens the outer shell on your seeds. When they are ready to sprout, they sprout. As the weather starts to warm, you’ll want to watch the soil to make sure it doesn’t dry out, and water accordingly. This creates plants that are hardier, stronger, healthier, and more productive. Last year I winter sowed my mesclun at the end of January, set them outside, and I had baby lettuce sprouts by late February!

1374855_10100259653235065_604297501_n
Do you grow kale? You should! It produces like a beast, making the most inexperienced gardener feel like a rock star. Plus, it’s delish and crazy healthy. This kale was also winter sown in January and produced well through November in my Zone 6 garden.

I linked this post to: Frugally Sustainable and the Homestead Barnhop

Thursday, January 2, 2014

2014 and Garden Planning

Happy New Year!!

We had a busy, yet relaxing Christmas this year. Sounds kind of conflicting, doesn’t it? We were busy in that we spent a great deal of time moving from one family party to another, but it was relaxing because we were so at peace with it. I’ve always found holiday party hopping to be extremely stressful. I really resented it. This year, though, something was different. I was honestly just thankful for the opportunity to be able to visit with so many friends and family. Not that there’s anything wrong with wanting things to be low key. There isn’t. I just really wanted to take this season to be thankful that we have the ability to visit. I know so many live far away from their family. Holidays can get lonely when everyone you know and love is far away. I found more relaxation and peace in my decision to be grateful than I ever did in my resistance in previous years where I sort of dug my heels into the ground about the whole thing. Gratitude … it’s something that I’m working on within myself. Among other things. Winking smile
004 (3)
022
So, now we’re on to 2014! I’m not big on New Years Resolutions, but I do have a few goals for the homestead. I want to continue to work towards growing as much as our own food as possible. Maybe get few laying hens. Continue fixing up the house for resale (so that we can some day move onto our dream homestead). Last year I chose a virtue that I wanted to work on, and I really worked toward being more humble. This year, I’d like to work on being more charitable. With my time, resources, talents, personality, in the way I treat others, in the way I perceive others, etc.
014 (2)

We’re in the middle of a wimpy sort of winter storm right now. I don’t really think it qualifies as a storm, but the weather people are issuing severe winter storm warnings. What do you think? Does 3-5 inches of snow sound like severe winter weather to you? I suppose it’s all relative. I remember the ice storm of 1991. I was very young at the time, but I still remember days without power and being huddled around my grandparent’s wood burning stove for warmth. So, most things sort of pale in comparison.
042
(My daughter got ahold of my camera and messed with the settings…that’s why the date and time stamp are there. And way off.)
Being holed up in the house for a few days while the wind chills are in the negative have me daydreaming about Spring. And this leads me to garden planning. Naturally. I know it sounds sort of crazy to be thinking about a garden in the dead of winter, but I’ll actually be starting planting in just a few weeks. Yep- Sowing seeds in January in Western, New York! More on that later.

So, I’ve got a cup of tea, my box of seeds (I’m pretty sure that there’s a proper way to store seeds from year to year that doesn’t involve an old baby wipes container. Note to self: Research seed storage), my 2014 seed catalogs, and some scrap paper. I’ll do a separate post on garden planning. How I do it, anyway. Have I mentioned yet that I have a notoriously BLACK thumb? Prior to last year, I hadn’t ever really kept a plant alive for long. So, I’m certainly not an expert. I did have an exceptionally successful garden last year, though. So I’m happy to share what I’m learning as I go along.
043
045
048

In the meantime, I recommend ordering seed catalogues from companies who offer HEIRLOOM seeds (aka not genetically modified. You’ve heard of the GMO debate with Monsanto and the like, yes? No? Do you live under a rock?). Anywho, here are a couple of my faves:
https://botanicalinterests.com/
www.rareseeds.com
It’s also helpful to locate a local nursery that offers heirloom seedlings. Last year I had a heck of a time germinating tomatoes for some reason, and I was able to get heirloom tomato starts from a local nursery that saved my behind. Starting from seed is ideal for the budget, but sometimes you just need a little help.

Also: Pick up a pad of graph paper and start collecting clear containers, such as clear milk jugs and the clear clamshell type produce containers. Meet me back here in a few days- I’ll discuss more garden planning then.

P.S. You will notice from my above photographs that I am not one of those bloggers with mad photography skills. I promise to work on that. Maybe. If I can find time.

- Ashley

I linked this post to: Frugally Sustainable and Homestead Barn Hop