Hi Friends!
I wanted to let you all know that I've moved my blog over to a new site in order to have a little more freedom than what the platform here offers. I hope you'll all click over there and keep up with what we're up to in our neck of the woods.
I've kept the name of the blog the same, so just head over to growpraybuild.com and have a look around. It's a work in progress, but my smarty pants husband is helping me learn the ropes of designing and keeping up a blog in a self-hosted capacity. He's great like that. :)
Sunday, July 27, 2014
Friday, July 25, 2014
A North Eastern Fall Garden

Lots of Fall garden articles are geared toward people who live in warmer clients. But the truth is, there's a lot that we can do in the north, too.
Where I am, I don't have time for a second crop of cabbage or broccoli. They're typical Fall garden options, but really not practical for my climate. They just wouldn't have enough time before a hard frost hit. Sure, I could speed things up by starting them under lamps inside, but grow lamps are expensive and I'm really a no-muss no-fuss kind of gardener anyway.

I'm going to be sowing a cover crop in my large garden bed this year to try and get some nutrients back in the soil for next year. I got the Peas/Oats blend from Botanical Interests. I may block out a small patch for some carrots. I haven't decided if I'll do those in the raised bed or not. I'll use my 2 4x8 raised beds to try out a winter/fall garden this year once they've cleared out for the summer. I have some old leftover windows that I'm excited to use over the raised beds to form a kind of green house- you know, to extend the season a bit when temps start to drop.
This chart on the Mother Earth News website is so helpful. I refer to it constantly!
Here's what I'm going to be planting in my Fall/Winter garden this year. I'll start these plantings in the next couple of weeks (early-mid August). My plan is to direct sow everything. I could be a nice gardener lady and be gentle to my little seedlings and start them inside, but .... ain't nobody got time for that. I'll be starting the garlic from bulbs.

Fall Garden (All Heirloom Varieties):
- Mesclun (Gourmet Baby Greens from Botanical Interests)
- Carrots (Little Finger and Calliope Blend from Botanical Interests)
- Garlic (Music from Baker Creek Seeds)
You may have noticed a trend. I love Botanical Interests for all of my seeds. I first heard about them from an awesome blogger, Mavis, over at One Hundred Dollars a Month. I've been so happy with their products that I now purchase almost everything from them. Seriously almost perfect germination rate. If you've never tried their heirloom seeds, I highly recommend ordering a catalog for next year!
That's it! I have a TON of kale in my garden, and last year it stayed alive and continued to produce until late November when we got our first real snow. So I'll have that and the beet greens for our leafy greens. Nothing fancy. I tend to need a bit of a break after several months of intensive gardening over the Spring and Summer. I like to take it easy and keep it simple in the Fall.
Here are a couple of other ideas:
- Collards
- Fennel
- Cilantro
- Radishes
- Scallions
- Spinach
- Rutabaga
Things to be aware of:
Two of your biggest concerns when planting a Fall garden are going to be pests and scorching temperatures. The temperatures are less of an issue for where I am, but if they were, I'd probably handle this by figuring out a way to start the seeds indoors. High temperatures and low rainfall are not ideal for germinating seeds.
Pests, on the other hand, is an issue I am dealing with this year. The best way to battle this is through summer weight row covers. This will help keep butterflies and moths from laying eggs on and around your plants, which then hatch into nasty little caterpillars (cabbage worms) that will consume your tender young brassica seedlings in no time. The best way to deal with these pests, especially on vulnerable little plants, is prevention.
Tip: If you don't manage to prevent them, some organic options for controlling cabbage worms that I've had success with are Spinosad and a 1:1 combination of baking soda mixed with all purpose flour and sprinkled on the invaded plants. The catterpillars will eat the flour mixture, bloat, and die within a day or so. I had more success with the Spinosad. It completely wiped them out. But before I found Spinosad, the flour mixture did significantly decrease the cabbage worms.
When to Plant a Fall Garden: This is going to depend on your average first frost date. Use this chart to check. Then follow the instructions on your seed packet. Most of them will say you can plant a particular seed X weeks before/after last frost, up until X weeks before first frost.

Tip:
Your soil has been working hard all summer, having nutrients used up by your Spring and Summer crop. Give your Fall garden its best shot by giving it a good dressing of quality compost when you do your Fall planting.
This is a list of some of the awesome sites that I occassionally link my posts at. They're all great blogs about anything from parenting, simple living, cooking, homesteading (backyard and large scale), gardening, Christian life, frugal living, etc. Check them out!
The Chicken Chick, The Prairie Homestead- Homestead Barn Hop, Strangers and Pilgrims on Earth- The Art of Homemaking, Homestead Bloggers Network- Tasty Tuesday, Backyard Farming Connection, Growing Home- Growing Homemakers, Wildcrafting Wednesday, So Much At Home, Hope in Every Season, Green Thumb Thursday, Home Acre Hop, From the Farm Hop, Farmgirl Friday, Front Porch Friday, Simple Meals Friday, Better Hens and Gardens.
Wednesday, July 23, 2014
Brown Sugar Cinnamon Glazed Buttermilk Biscuits
This has become one of my family's favorite breakfast treats. Healthy? Not even close. Delicious and warm and gooey and comfy? You bet.

They're so good. So, so good. Try them. You won't regret it. Promise.

Recipe makes 9 biscuits with a 3 inch biscuit cutter.
Ingredients:
- 2 cups all purpose flour
- 1 Tablespoon Baking Powder
- 1/4 teaspoon Baking Soda
- 1 Teaspoon salt
- 6 Tablespoons COLD butter, cut into cubes
- 1 cup buttermilk
- 1/3 cup brown sugar
- 1 teaspoon cinnamon
For Glaze:
- 6 Tablespoons butter
- 1 cup powdered sugar
- 1 teaspoon vanilla extract
Directions:
- Preheat oven to 450 degrees.
- Combine the flour, baking powder, baking soda, and salt in a medium mixing bowl.
- Cut in cold butter with a pastry cutter until resembles course meal.
- Mix in buttermilk until combined.
- Turn out biscuit dough onto a floured surface and pat (don't roll) flat to about 1/4 inch thickness.
- Sprinkle brown sugar and cinnamon over the dough, and fold it in about 5 times.
- Pat our flat again and cut into biscuits with your biscuit cutter.
- Place biscuits in your baking dish (I used my 12 inch cast iron skillet) and bake 15-20 minutes depending on your oven.
- To make the glaze, melt 6 tablespoons of butter in a small saucepan, then whisk in powdered sugar and vanilla until all is combined and a smooth consistency is reached.
- Serve biscuits warm with glaze drizzled on top.
Tip: To get fluffy biscuits, you want to keep that butter as cold as possible until it goes in the oven. Those little bits of butter will melt in the oven, causing little steam pockets, resulting in deliciously fluffy biscuits. So touch it as little as possible, because the warmth of your hands will start to melt it prematurely!
This is a list of some of the awesome sites that I occasionally link my posts at. They're all great blogs about anything from parenting, simple living, cooking, homesteading (backyard and large scale), gardening, Christian life, frugal living, etc. Check them out!
The Chicken Chick, The Prairie Homestead- Homestead Barn Hop, Strangers and Pilgrims on Earth- The Art of Homemaking, Homestead Bloggers Network- Tasty Tuesday, Backyard Farming Connection, Growing Home- Growing Homemakers, Wildcrafting Wednesday, So Much At Home, Hope in Every Season, Green Thumb Thursday, Home Acre Hop, From the Farm Hop, Farmgirl Friday, Front Porch Friday, Simple Meals Friday, Better Hens and Gardens.
Friday, July 18, 2014
Plantain Tincture

What's Plantain?: Plantain is an herb that grows just about everywhere and it's easy to recognize. For this reason, it's a great starter for the novice herbalist. It's been used for hundreds and probably even thousands of years to treat a number of different ailments from dandruff to upper respiratory infections (source).
Of course, you should always consult your physician before using any herbal/natural remedy!
How Do You Recognize It?: There are a few different varieties of plantain. The one that grows most in my yard, and with which I'm most familiar, is the broadleaf plantain (Plantago Major). It has very distinct Broad Leaves. The veins on the leaves start at the base and extend outward. Plantain also has very distinct flowers (pictured below) and the leaves will usually grow around the base of the flowers (as seen in the middle picture).

How Do You Use It?:
- The leaves and juice from the leaves can be used to treat sunburns, bug bites, and minor scrapes and burns. Plantain contains antibacterial and antimicrobial properties, think of it as a natural Neosporin.
- It can be made into a tea or tincture to help tummy troubles (diarrhea, indigestion, ulcers).
- The same tea can be used as a hair rinse to treat dandruff.
- Plantain is rich in tannins, which can be an aid in stopping bleeding.
- A tea or tincture applied externally can reduce the itching that comes from poison ivy, poison oak, bug bites, or rashes.
What's a Tincture?: Tinctures are basically extracts of a particular herb. This is usually done with alcohol. It can also be done with vegetable glycerin or apple cider vinegar, but alcohol (vodka or grain alcohol no lower than 80 proof) will create the strongest tinctures, with the highest concentration of that herb's extract.
Here is a really great article on Herblore.com that goes into more depth *in plain English* about tinctures. It includes dosing guides as well. Actually, it's a really awesome website all together.

NOTE: If you're harvesting plantain yourself rather than purchasing it dried, be sure to harvest from an area that you're certain hasn't been sprayed by lawn treatments, other chemicals, or ... ahem ... your dog (or other animals).
I'll be making my tincture with fresh plantain. This stuff is everywhere in our backyard, and there's a little patch in the corner where no one really bothers to go.
 What You'll Need:
-A good bunch of fresh plantain leaves. How much depends on the size of the container you'll be using.
-A mason jar with a lid
-Vodka or grain alcohol (80 proof or higher)
-At the 2 week point you'll want to transfer your tincture to a dropper bottle, so either buy some now or plan to buy some within the next two weeks.
What to do:
1. After you've harvested your plantain leaves, give them a good cleaning to remove any dirt. Then chop give them a good chop. Alternatively you could chop them in a food processor. Just don't over do it. We're not making plantain pesto here. :)
2. Put the chopped plantain into your jar.
3. For every one part of chopped plantain leaves, add in 2 parts alcohol. Make sure all leaves are covered to prevent any mold issues.
4. Put the lid on and label with what it is and when you made it. Give it a good shake! Store in a dark cabinet.
5. Shake the plantain daily for two weeks.
6. Strain with a mesh colander or some cheese cloth, and store in a dark glass dropper bottles. Label and store in dark cabinet.
Aside from the uses that I mentioned above, this article has some neat and specific dosages for different uses for plantain tincture, as well as some of the other herbal preparations that can be made with it.
This is a list of some of the awesome sites that I occassionally link my posts at. They're all great blogs about anything from parenting, simple living, cooking, homesteading (backyard and large scale), gardening, Christian life, frugal living, etc. Check them out!
The Chicken Chick, The Prairie Homestead- Homestead Barn Hop, Strangers and Pilgrims on Earth- The Art of Homemaking, Homestead Bloggers Network- Tasty Tuesday, Backyard Farming Connection, Growing Home- Growing Homemakers, Wildcrafting Wednesday, So Much At Home, Hope in Every Season, Green Thumb Thursday, Home Acre Hop, From the Farm Hop, Farmgirl Friday, Front Porch Friday, Simple Meals Friday, Better Hens and Gardens.
Tuesday, July 15, 2014
July Garden Update
Time for another monthly garden tour!

This year is definitely shaping up a bit differently than last year. We're having much more in the way of pest issues. In fact, I believe those cucurbit beetles may have infected one or two of my zucchini plants with bacterial wilt. :( For now, they're still producing, but the leaves just do not look happy. I expect that they'll be finished off within the next few days if my suspicions are correct. So sad.

Ye trusty ole kale. Something seems to be snacking on it a bit, but I can't figure out what it is. It's not doing too much damage, though. Thankfully.

The mesclun mix in my pallet raised bed is growing slower than molasses!! I don't know if it's a sunlight issue or a soil issue. I think I'm going to replant some in the main bed somewhere. Otherwise we won't have any lettuce until Thanksgiving time at this rate.

When I went outside to take pictures for this post, I realized that something is also snacking on my cabbages. Probably the same thing that's munching on the kale. For now, growth doesn't seem to be impacted. We're having a lot of rain right now, but when it stops, I'll go out and sprinkle some diatomaceous earth and see if that helps.

Peppers are starting to come in!

And our tomatoes. Here we have brandywine, san marzano, and black chery.


Who doesn't love the look of a squash blossom!?

I think beets are my new favorite thing to grow. I love root veggies, especially in the fall. I planted half of a raised bed with beets in early spring as a trial run. We're enjoying them so much that I'm planning to plant a full raised bed next month in order to have a Fall harvest. Beets and Fall just go together, in my opinion. Do you have any favorite beet recipes?

We planted these black raspberry brambles last year. Only two of them survived our very harsh winter, but those two little brambles have produced about 4 cups of berries so far! Not exactly enough to make into jam, but the kids are having fun snacking on them anyhow. I'm hoping to plant some more next year. We didn't get around to it this year before I realized that half of them had died.

My mom planted this sweet potato in an empty space in my garden. Our climate here is too cold for it to actually produce, but she's having fun watching it grow. She cut the top off of a sweet potato, set it in a dish of water by a sunny window until it sprouted, and set it in the soil! Neat little experiment ...

The pumpkins and butternut squash are doing well, as are the cucumbers, so long as those cucurbit beetles don't come back. On my post about getting rid of cucurbit beetles, someone commented about using Neem Oil to get rid of them. I ordered some *just in case* those pesky bugs come back. Hopefully I won't have to use it, but I figure it can't hurt to have more than one tool in your gardening arsenal!
Oh, and my broccoli and cauliflower are growing well, too! :)
How's your garden doing so far this year? Any major successes? How are you battling pest issues or nutrient deficiencies that have snuck up on you?
This is a list of some of the awesome sites that I occassionally link my posts at. They're all great blogs about anything from parenting, simple living, cooking, homesteading (backyard and large scale), gardening, Christian life, frugal living, etc. Check them out!
The Chicken Chick, The Prairie Homestead- Homestead Barn Hop, Strangers and Pilgrims on Earth- The Art of Homemaking, Homestead Bloggers Network- Tasty Tuesday, Backyard Farming Connection, Growing Home- Growing Homemakers, Wildcrafting Wednesday, So Much At Home, Hope in Every Season, Green Thumb Thursday, Home Acre Hop, From the Farm Hop, Farmgirl Friday, Front Porch Friday, Simple Meals Friday, Better Hens and Gardens.
Thursday, July 10, 2014
Healthy No Bake Energy Bites That Actually Taste Good

I know there are a lot of no-bake cookie recipes out there, but I've never been impressed with any of them. Some of them are "okay". Others I would rank as "edible". I never saved any of the recipes for them because I just wasn't terribly impressed.
THESE, my friends, are something different. THIS no-bake snack tastes good. Really good. They whip up quickly. You don't have to bake them, obviously, which is great for summertime when you don't want the oven heating up the house. You actually store them in the freezer, so they're a great cool snack (just set them out for 5ish minutes so they soften up a bit).
Plus ... check out those ingredients. Healthy! I may or may not have served these things for breakfast a couple of times. I found the base recipe from Amy's blog at Plain and Not So Plain (great blog for larger families, by the way). Amy says that having these energy bites on hand was key while she was losing 70lbs. When she was craving something sweet, she grabbed one of these instead of gorging on something unhealthy.
I tweaked the recipe ever so slightly based on our tastes and what I had on hand. I hope you enjoy!
Ingredients:
2 c. Old Fashioned Rolled Oats (Quick Oats would probably be fine)
1 c. Peanut Butter (Or your favorite nut butter- almond, cashew etc.)
2/3 c. Honey (Local, if possible!)
2 c. shredded unsweetened coconut
1 c. ground flax meal.
1 c. chocolate chips (alternative: dried fruit, butterscotch chips)
1 tsp. ground cinnamon
1/2 tsp. vanilla extract
Line a couple of cookie sheets with parchment paper. Combine all ingredients and roll into little balls (this is easiest to do with slightly damp hands). Put the energy bites onto your lined cookie sheet, and put them in the freezer. Once they are frozen solid, you can transfer them to a ziplock bag and store them in the freezer. When you're ready to eat them, just pull them out and let them sit on a plate for 5ish minutes to help them soften up a bit. Enjoy!
----This is a list of some of the awesome sites that I occassionally link my posts at. They're all great blogs about anything from parenting, simple living, cooking, homesteading (backyard and large scale), gardening, Christian life, frugal living, etc. Check them out!----
The Chicken Chick, The Prairie Homestead- Homestead Barn Hop, Strangers and Pilgrims on Earth- The Art of Homemaking, Homestead Bloggers Network- Tasty Tuesday, Backyard Farming Connection, Growing Home- Growing Homemakers, Wildcrafting Wednesday, So Much At Home, Hope in Every Season, Green Thumb Thursday, Home Acre Hop, From the Farm Hop, Farmgirl Friday, Front Porch Friday, Simple Meals Friday, Better Hens and Gardens.
Tuesday, July 8, 2014
How to Get Rid of Cucumber Beetles Naturally
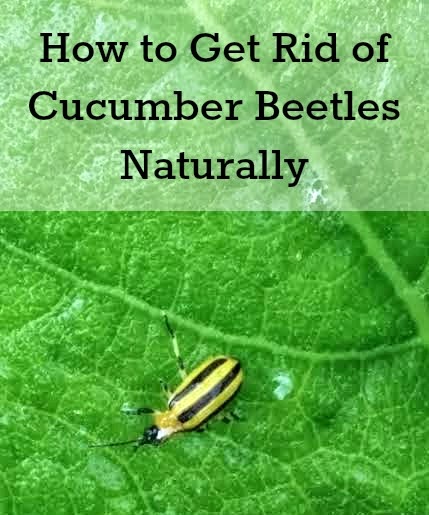
So, I was out in the garden one day weeding. I looked over to my left and saw this little beetle. It was quite flashy. Yellow and black stripes. Being the naive, novice gardener that I am, my reaction was, "Oh! That's a pretty bug! Hi, little bug!." Something in the back of my mind thought that, since I'd never seen this bug in my garden before, maybe it wasn't really supposed to be there. I only saw one of them, though. So, I didn't think too much of it. I made a mental note to look it up.
Two days later, I saw five of them. So now I knew they were invading, and I really needed to research. I thought I might have cucurbit beetles, but wasn't sure.
Two more days ... there was no denying it. I have a cucumber (cucurbit) beetle problem. Cucurbit Beetles will attack anything in the cucurbit family (squash, gourds, cucumbers, melons), which includes about 1/3 of my garden. They'll eat the leaves of your plants, but perhaps more menacing, they carry a bacteria in their intestinal tract that can cause bacterial wilt. Bacterial wilt can wipe out an entire crop in a matter of days. Bad news!
You won't find me using invasive pesticides in my garden. So I'm always going to search for a homemade or natural remedy.
First I tried a garlic hot pepper spray. I honestly only tried this for about 6 hours before I decided it wasn't working. The beetles stayed on the leaves, totally unscathed by my spritzing them with garlic and hot pepper. Maybe I wasn't using hot enough peppers (I just used cayenne pepper from my pantry, while some people actually got habaneros from the grocery store and blended those in). This could totally be user error on my part. In fact, it probably is. I'm going to buy some habaneros and try this again as a preventative spray, perhaps? I'll update once I've tried it.
Next I tried food grade diatomaceous earth. I've read time and time again that it doesn't work on cucurbit beetles, but I figured I'd try it since I already had it on hand. Diatomaceous Earth is a totally non-toxic substance that can be used as pest control in your graden (and even on pets for flea control!). It's a powder made from the pulvarized fossils of diatoms (algae) and basically looks like shards of glass under a microscope. It works by being physically abrasive to the insects which come in contact with it. Imagine trying to crawl through shards of glass. Insects won't become immune to physical control the way that they can become resistant to insecticides.

Verdict: Success!! A applied a substantial coating of DE to the leaves, stems, and around the roots off all plants in the curcurbit family (all of my squash and cukes). I wasn't shy with this coating at all. My cuke and squash plants were all white, to give you an idea. I only had 1 open blossom on any of my plants yet, so I wasn't too worried about my bee friends. The next day, there were still a few stubborn guys hanging around, but by day 3, not a single beetle in sight. I'm keeping an eye on the plants and will reapply as necessary. Keep in mind that any rain or even a heavy morning dew will render the DE ineffective. So you'll need to reapply any time it gets wet.
Good Luck! I hope this helps keep your squash and cukes safe this gardening season.
This is a list of some of the awesome sites that I occassionally link my posts at. They're all great blogs about anything from parenting, simple living, cooking, homesteading (backyard and large scale), gardening, Christian life, frugal living, etc. Check them out!
The Chicken Chick, The Prairie Homestead- Homestead Barn Hop, Strangers and Pilgrims on Earth- The Art of Homemaking, Homestead Bloggers Network- Tasty Tuesday, Backyard Farming Connection, Growing Home- Growing Homemakers, Wildcrafting Wednesday, So Much At Home, Hope in Every Season, Green Thumb Thursday, Home Acre Hop, From the Farm Hop, Farmgirl Friday, Front Porch Friday, Simple Meals Friday, Better Hens and Gardens.
Subscribe to:
Posts (Atom)